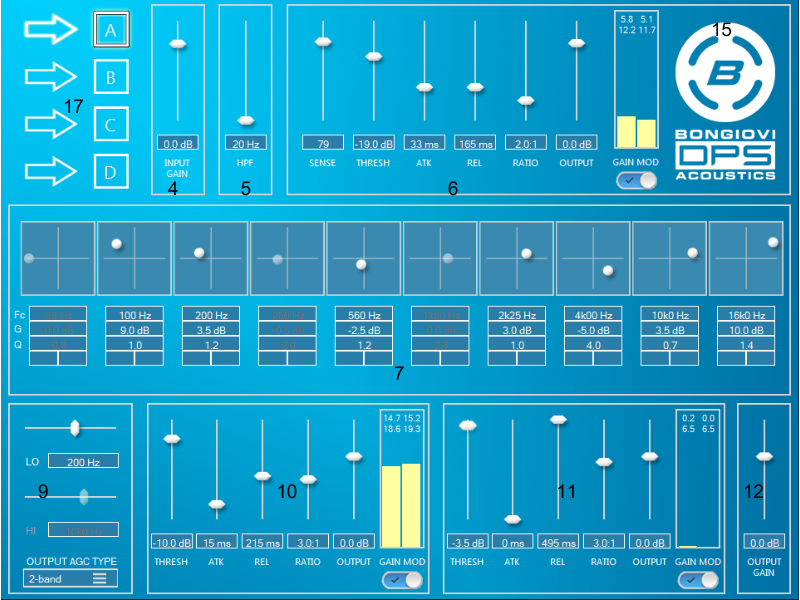
4 Input Gain
- This control sets the level going into the main Bongiovi DPS processing section (blocks 4 through 12).
5 High Pass Filter (HPF)
- Used to prevent very low frequency from entering the audio system that can damage small speakers.
- Right-click to Enable/Disable the HPF.
6 Bongiovi Automatic Gain Controller (AGC)
- NEW: When in 3 band output AGC mode, the Bongiovi AGC can be set to INPUT (default) or OUTPUT for 3 band speaker protection. See Crossover below for details. In other output AGC modes, the INPUT/OUTPUT selection is not available.
- This patented AGC is sensitive to frequency content similar to human hearing.
- A large amount of gain control/gain modulation is possible with this block.
- More gain modulation allows for more equalization of the audio.
- The Bongiovi AGC provides clarity in high noise environments and increased sensitivity.
- Use SENSE control to adjust the amount of sensitivity to loud sounds.
- A maximum of 6dB to 10dB of gain modulation for loud music is a good place to start.
- Click here for more detail about Bongiovi dynamic range controllers.
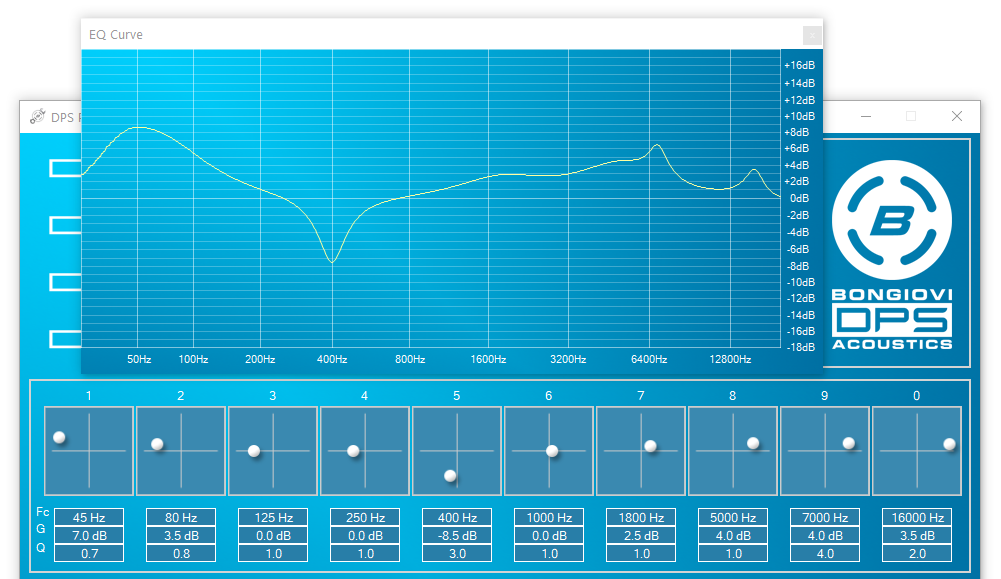
7 Parametric Equalizer
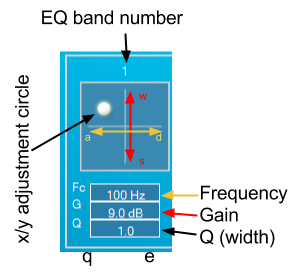
- This is a 10 band (IIR bell filter) mastering quality equalizer.
- All bands can affect any frequency from 20Hz to 20000Hz.
- Click on a X/Y pad or press 1,2,3,4,5,6,7,8,9 or 0(10) to select an EQ band.
- Click and move the circle on the X/Y pad to control the EQ effect:
- Gain (vertical axis) control allows for 18dB boost and 12dB cut.
- Frequency (horizontal axis) sets the center of the frequency band to be affected.
- Use W,A,S,D or arrow keys for fine control over frequency and gain.
- Q value sets the width of the frequency band.
- Q values between 0.7 and 1.4 are best for normal boost and cut.
- Q values from 2.5 to 4.0 are useful for cutting unwanted resonant frequencies.
- Press Q key to decrease (make wider) the Q value. Press E key to increase (make more narrow) the Q value.
- Right-click on the Q text box to open a menu of all available Q values.
- Right click on a band to open the EQ bypass/reset contextual menu:
- Bypass EQ – Enable/Disable the currently selected EQ band.
- Bypass All – Disable/Enable all EQ bands.
- Reset EQ – Reset the current EQ band to it’s default value.
- Reset All – Reset all EQ bands to their default values.
TIP: Use higher Q values (2.0 or above) for frequencies above 10,000Hz. The DPS Equalizer is a unique algorithm that seeks to emulate the sound of analog hardware. As a result, lower Q values have a very wide effect on high frequencies. This is a known characteristic of the DPS Equalizer. Click here to learn more.
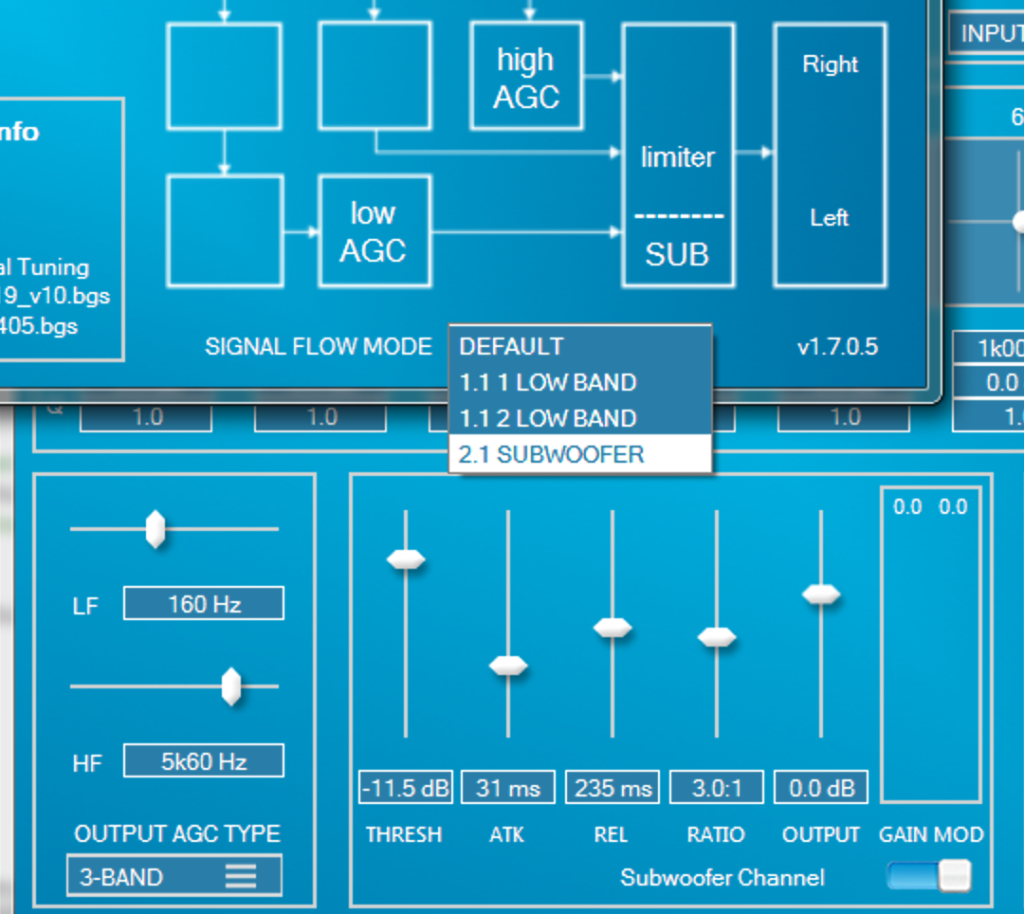
9 Crossover
- This is used to split the signal into High, Mid and Low frequency bands.
- AGC Low Frequency (LO) Edge – This sets the frequency band that will be affected by the Low band AGC. All frequencies below the LF Edge value will be affected.
- When in 2.1 mode, this controls the subwoofer crossover frequency.
- AGC High Frequency (HI) Edge – This sets the frequency band for the High band AGC. All frequencies above the HF Edge will be affected.
- Output AGC Type
- 2 band mode
- Crossover is set to 2 bands
- LO AGC and Virtual Subwoofer affects low band
- HI AGC affects high band
- 3 band mode
- Crossover is set to 3 bands
- LO AGC and Virtual Subwoofer affects low band
- HI AGC affects high band
- When Bongiovi AGC is set to INPUT the mid crossover band passes through with no effect. When the Bongiovi AGC is set to OUTPUT the Bongiovi AGC is placed on the mid band to provide high quality 3 band compression.
- Low Only (deprecated)
- Crossover is set to 2 bands
- LO AGC and Virtual Subwoofer affects low band
- HI AGC is not used to conserve CPU resources.
- Serial ARM Tuning Mode
- HI AGC is enabled and moved to the end of the signal path for full range speaker protection.
- Full band
- This eliminates the crossover from the signal chain.
- LO AGC will now affect the entire frequency spectrum.
- Virtual Subwoofer is not available.
- HI AGC is not used.
- 2 band mode
- AGC Low Frequency (LO) Edge – This sets the frequency band that will be affected by the Low band AGC. All frequencies below the LF Edge value will be affected.
10 LF AGC and Subwoofer Controls
- The Low-Frequency AGC is used to prevent loud bass signals from damaging speakers.
- When using Virtual Subwoofer, this AGC is used to protect the speaker from short, loud low-frequency sounds.
- When in 2.1 mode, this AGC controls the output of the subwoofer channel.
- The subwoofer crossover frequency is controlled by the LF crossover.
- The High Pass Filter is also applied to the Subwoofer Channel.
- The limiter does not affect the subwoofer channel. The output of the Subwoofer channel is protected by a soft-clipping algorithm.
11 HF AGC
- The High-Frequency AGC is used to prevent loud, high-frequency signals from hurting the user’s ears or creating an unpleasant effect for headphones. It is also used for speaker protection when in 2 band mode or Low Only mode for ARM platforms.
- Click here for more detail about Bongiovi dynamic range controllers.
12 Main Output Gain
- This control sets the output level of Left and Right channels before the Limiter.
- NOTE: when in 2.1 mode, this does not affect the Subwoofer output.
15 DPS ON/OFF
- Click the B button logo to turn all Bongiovi DPS processing on or off.
- When DPS processing off, User Volume control is still applied.
17 Preset Control
- Click the arrow to load current state of the GUI into desired preset A,B,C or D.
- Click the A,B,C or D buttons to recall the desired preset.
- If changes are made to a current preset, the changes will be saved when another preset is selected.
- When exporting for ARM, the presets saved into A,B,C and D are included in the indices.c file.
- In multi-channel platforms the presets correspond to these channels:
- A = Front Left, Front Right
- B = Rear Left, Rear Right
- C = Sub
- D = Center