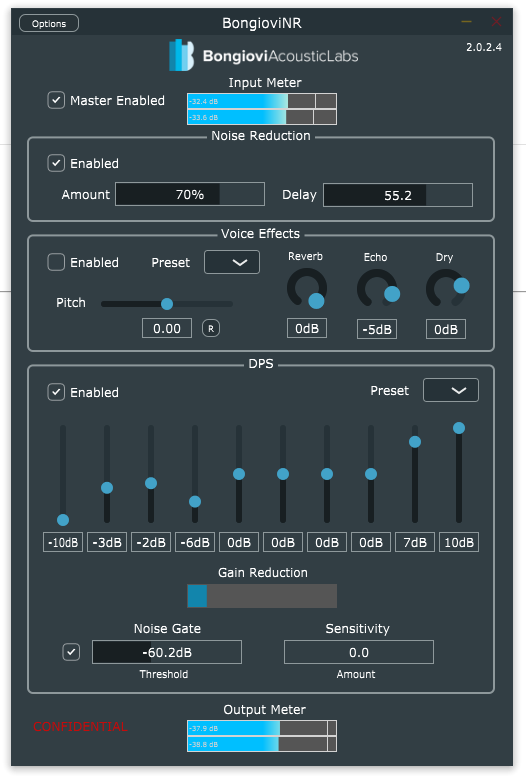
The BongioviNR application demonstrates all features available in the DPSMic SDK. The signal path is represented from top to bottom; first, Neural Network Noise Reduction is applied, to isolate speaking voices, then Voice Effects are applied if desired. The result is processed by the core DPS algorithm for improved speech intelligibility.

- Master Enabled – Enable or Bypass all processing.
- Noise Reduction Enabled – Enable or Bypass the Noise Reduction Algorithm.
- 2.a Noise Reduction Amount Slider – Adjusts the amount of Noise reduction result with 0% being the least and 100% being the most Noise Reduction.
- 2.b Noise Reduction Delay – Used to synchronize the original signal with the fully-effected signal. 55.2 milliseconds is a good default for most sample rates.
- Voice Effects Enabled – Enable or Bypass the voice effect algorithms.
- 3.a Effect Preset Selection – Select a vocal effect preset:
- Smooth Ballad
- Springs
- Small Room
- Echo Plate
- Mama Robot
- Epic Cave
- Baby Robot
- Daddy Robot
- Ambient Slap
- Dark Hallway
- Small Temple
- Long Echo
- Short Echo
- Medium Echo
- 3.b Effect Balance Sliders – Adjusts the levels of Reverb, Echo, and Dry/ Original Signals.
- 3.c Pitch Shift Slider – Adjusts the amount of pitch-shift affecting the voice.
- The “R” button resets the pitch shift amount to 0.
- 3.a Effect Preset Selection – Select a vocal effect preset:
- DPS Audio Enhancement Processing Enabled – Enable or Bypass DPS Enhancement Processing. Will also bypass Vocal Effects
- 4.a Preset Selection Dropdown – Allows the selection of different test presets with a focus on speech intelligibility and microphone enhancement. For most test cases, use Preset 1
- 4.b 10 Band Graphic EQ Sliders – Allows the adjustment of frequency response.
- 4.c Noise Gate Controls – Noise gate can be turned on or off using the checkbox. The Threshold can be adjusted using the bar slider.
- 4.d Sensitivity – Allows the adjustment of dynamics by moving the slider up or down with 10 being the most Dynamic Control.
- Input Meter – Shows the level of the input signal.
- Gain Reduction Meter – Shows the amount of Gain Reduction across all dynamic range components.
- Output Meter – Shows the level of the output signal.
Example Settings for Webcams
The default presets work well for headset microphones. Try the settings below if you are using webcam, laptop or other ambient microphones. Notice changes in the result between 100% and 70% noise reduction amounts. This is useful for fine-tuning the user’s experience with your product.