When dealing with complex audio systems, it may be necessary to verify the sound from one state to another. Here are some examples:
- Verify audio settings are being recalled properly.
- Verify filter and dynamic range response.
- Verify integrity of audio processing without using software debug
- tools.
- Verify the audio is identical between various product samples.
Matching gain or other settings for different channels in an audio system.
One way to do this verification is performing a NULL test. In this test we play some source media (usually music) through our processing and record the result. Then we set up the comparison and record this second result. We then flip the phase on one of the results 180 degrees and sum all of the results together. If there is any amount of the original music still playing the null test fails. A successful test should sound like silence or faint crackling (especially when using analog connections). Below are the steps to do this using the free audio software Audacity.
You will need some way of recording the electrical output of your audio system into an uncompressed format. For these steps I will assume you have something like a MacBook Pro or other laptop that has stereo analog input. Any stereo audio computer interface will work as long as it is “Full Duplex”. This means you can record and playback stereo audio at the same time.
In this example we will be verifying a DPS profile is being loaded properly when the audio system is booted.
1. Download and install Audacity
2. Connect the line out of your computer to the line in of your audio system or DPS eval board.
3. Connect the line out of your audio system or eval board to the line in of your computer.
4. Load the DPS profile you are testing into your audio system or eval board. Be sure it is saved properly on the EEPROM or other memory space you are testing.
5. Launch Audacity on your computer.
6. Set the input and output for Audacity to the line input and output of your computer.

7. Select File–>Open and choose a music track to use for this test.
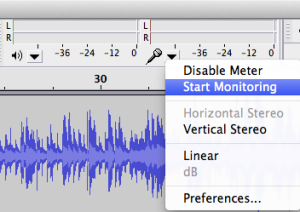
8. Click the drop down menu under the input level meters (microphone icon). Click “Start Monitoring” so you can see the audio level coming into your computer.
9. Click the Record button.

10. You should see both green (playback level) and red (record level) meters moving.
You will also see the Audacity has automatically created a new track where the audio from your sound system is being recorded. You only need to record a few seconds of audio for this test. Press the spacebar or click the “Stop” button. Congratulations! You have just recorded your first sample for comparison.
11. Click the “Mute” button on the track you just recorded. We don’t want this to play when we make our next recording.
12. Now set your system up for the next comparison sample. In this example we are disconnecting any computer USB cables and rebooting the audio system by disconnecting and reconnecting power. We expect the same profile to be loaded at boot.
NOTE:Do not change anything in your computer or recording setup at this time. You will get bad results if you do.
13. Once the audio system is booted, click “Record” in Audacity.
14. Record the new sample for about the same time as the last sample before pressing “Stop”. You should now have two recorded samples. The first representing a DPS profile loaded from a USB or debug connection and the second representing the profile loaded at boot.
15. Click “Mute” on the original source music track. We no longer need to listen to this.
16. Click “Mute” on the first recorded sample to un-mute it.
17. Now we are ready to compare the two samples using the Null test.
18. Double-click on the second waveform recording to highlight it.
In the Audacity top menu, select Effect–>Invert. This flips the phase of the second sample 180 degrees. When the two samples are played together, the second sample will be “subtracted” from the first sample.
20. Play the two audio samples together by pressing the spacebar. If everything is correct the only thing you should hear is a quiet crackling or static sound. This is generated by the random movement of electrons in the analog signal chain during the recording of both samples. If you are testing a digital system (with no sample rate conversion or dithering and synchronized clocks) there should be absolute silence.
21. While the two sample are playing, mute one of the samples. The audio will be at full volume. This is because the resulting audio is not being canceled out by the inverted sample.
The left over sound after subtracting one sample from the other may have various causes:
- The analog to digital conversion is not synchronized in this test. In some cases the subtraction result sounds like a rhythmic swishing sound at approximately -45dBFS. This is still considered a passing null test.
- What if there is an extremely faint representation of the music inside of the static below the noise floor of the system? This may be caused by common mode rejection within the analog audio cables, the audio connection may have been bumped or jiggled slightly between samples or a power fluctuation occurred between samples. We consider these types of issues within tolerance of normal audio system use and give it a pass.
- If there is a clearly audible (but quiet) representation of the music or pink noise after subtraction then you have a failed test result.
- Failed test results usually do not contain lower frequencies as lower frequencies are more easily canceled.
- High frequency content left over in a failed test result may represent filter settings changed between samples or phase issues.
- Lower level but full frequency content left over in a failed test may represent a change in volume between samples.
Hopefully this helps you troubleshoot your audio system. Contact us if you have any questions.