Currently, the Bongiovi DPS ARM SDK is supported by the Nuvoton NUC505 and M452 chips. The NUC505 has more memory and processing power while the M452 supports a USB audio codec.
The Bongiovi DPS SDK for the Nuvoton ARM M4 processors is made up of three main parts:
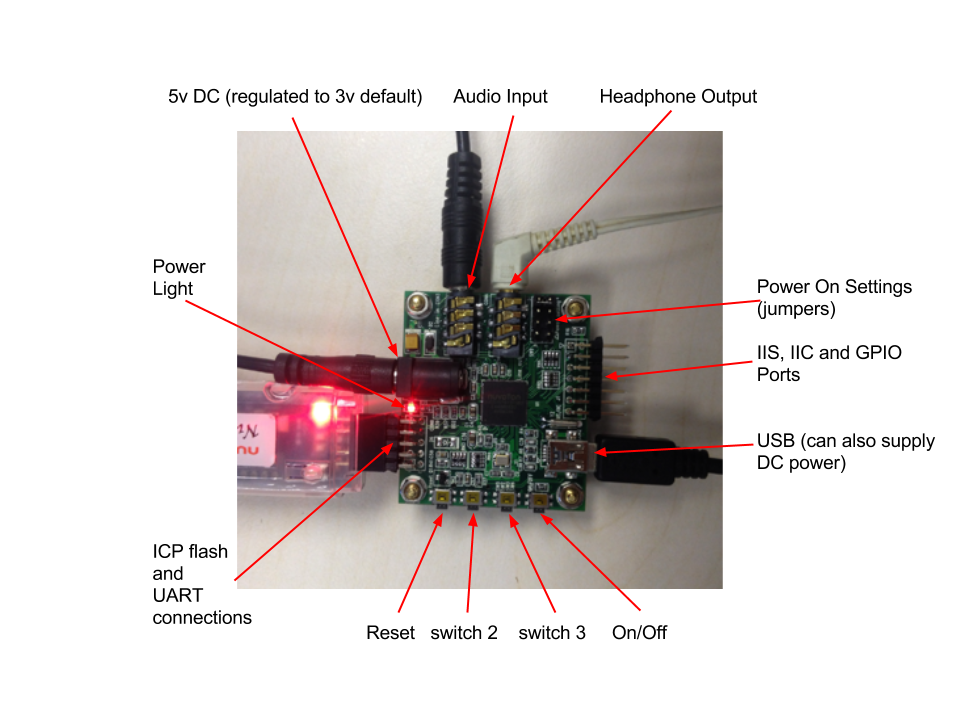
- NUC505 Audio Evaluation hardware – This audio demonstration board (pictured above) provides analog input/output s well as headers for convenient connection to UART TX/RX, GPIO, IIS, IIC and ICP flash programming.
- Click here to download the NUC505 Audio Board Description V1.01
- A Nu-Link or Nu-Link Pro ICP programming interface is needed for flashing compiled binaries into the NUC505. It is usually provided as part of a Nuvoton Development Kit.
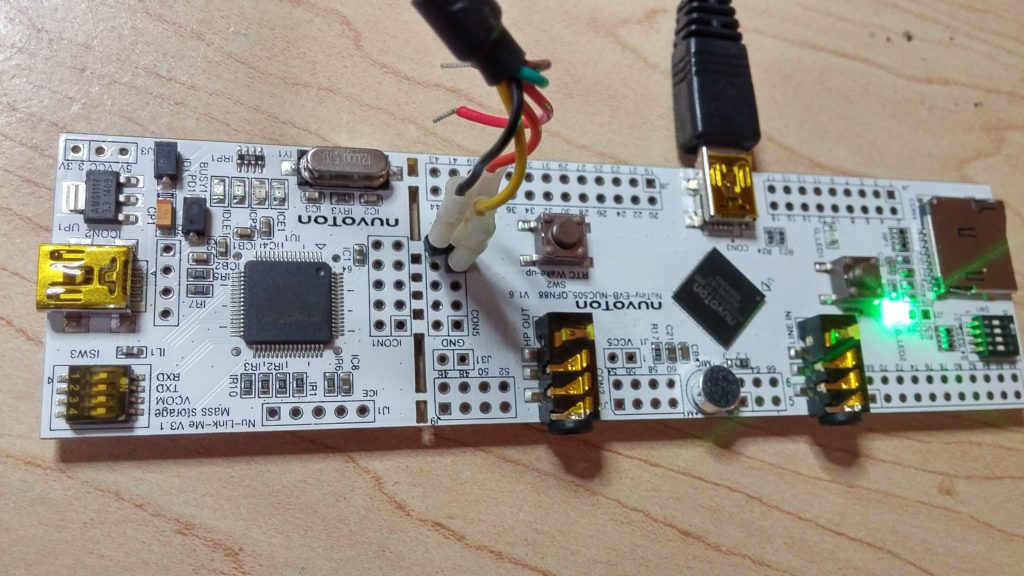
- The new Nu-Tiny EVB has the Nu-Link programming hardware included on the EVB. The Nu-Link tool is not necessary.
- A generic USB to UART serial interface is needed for connecting the Audio Board to the DPS Profile Creator.
- DPS Sample Keil Project – This is a source code project for the Keil IDE.
- The project contains the compiled DPS library and header files.
- The audio parameters are calibrated for the HMDX P420 portable speaker.
- It must be used with the NUC505 BSP version 3.00.002.
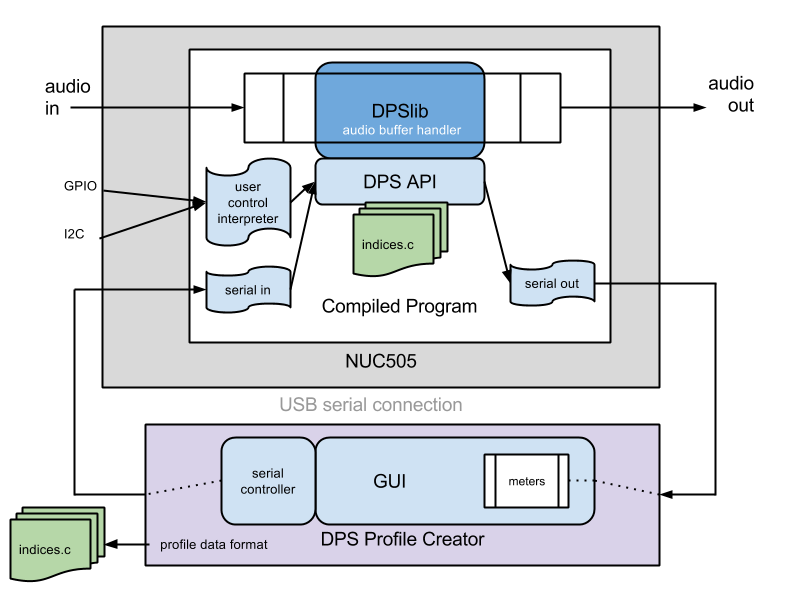
- DPS Profile Creator – This software is used to change parameters of the DPS audio processing library running on the NUC505 ARM M4 processor.
- The Profile Creator communicates with the Audio Board via a USB/serial UART connection.
- The Profile Creator generates an indices.c file that contains the audio parameters used in the Sample Project at runtime.
Demo Mode
The DPS library is supplied in demo mode for evaluation. Audio will stop for 2 seconds every 8 minutes. Bongiovi will supply an un-restricted library prior to production.
NUC505 Audio Board Setup
NOTE: Your evaluation board may be different. See the application notes for your EVB for equivalent connections.
- Install DPS Profile Creator on your computer.
- .NET framework 4.5 is required. Download the installer here.
- Be sure the latest firmware that includes DPSlib and an indices.c file is flashed into your NUC505 Audio Board.
- Be sure all necessary USB serial interface drivers are installed on your Windows computer.
- We recommend this FTDI Universal Serial Interface Cable.
- Click Here to download drivers for the FTDI serial cable.
- NOTE: The latest NuLink firmware for the NuTiny board provides a UART interface so an external serial connection is not needed. More details coming soon.
- Connect analog audio input and output to the Audio Board via the 3.5mm connectors.
- Connect USB Power.
- Connect the USB serial interface to the evaluation board and Windows computer.
- Connect Yellow Wire (RX1) of FTDI Cable to UART TX on the Audio Board.
- Connect Orange Wire (TX1) of FTDI Cable to UART RX on the Audio Board.
- Connect Black Wire (ground) of FTDI Cable to GROUND on the Audio Board.
- Launch the DPS Profile Creator on your Windows computer.
- The Profile Creator launches by opening the Main Window and User Controls.
- Click the Platform menu at the top of the Main Window.
- Choose ARM serial.
- Choose the serial COM port for your USB serial interface. The connection sequence will begin automatically.
- If connection is successful:
- The DPS logo will become enabled.
- All current parameters will be loaded from the ARM processor into the DPS Profile Creator.
- If connection is not successful:
- Connection Error will be displayed in the Information box in the Main Window.
- Check that the serial cables are connected properly.
- Select the COM port in Platform/ARM Serial menu again.
- If connection is successful:
- Click the Window menu
- Choose the Parameter window.
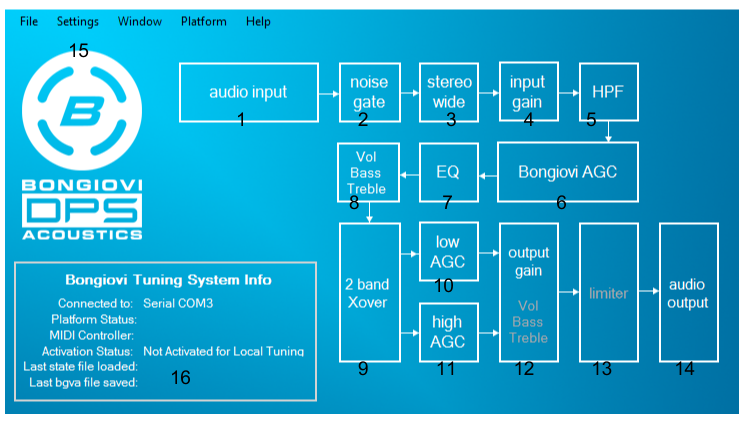
- Play audio into the NUC505 evaluation board. You will see yellow meters move in the Bongiovi AGC block on the Parameter window.
- You are now controlling DPS on the NUC505 ARM processor.
Using the DPS Profile Creator with the NUC505 Audio Board
The DPS API provides user controls for these functions:
- Volume Control
- DPS On/Off
- Stereo Widening (Enhancement) On/Off
- Stereo Widening Amount
- Bass and Treble
- Audio Profile Selection
DPS on/off is controlled by clicking the Bongiovi B button logo (15) on the Main Window:
The user controls are available on the User Control Window:
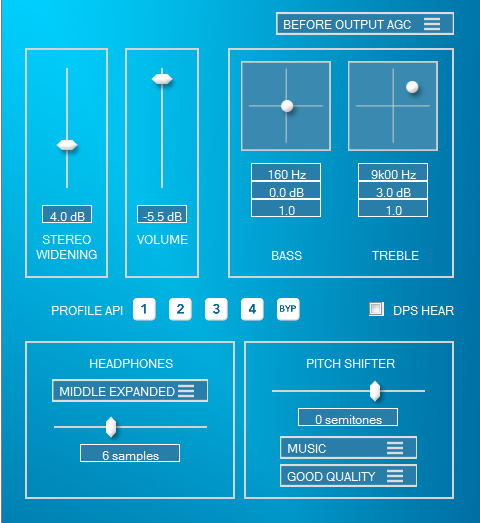
NOTE: Pitch shift and DPS HEAR are not currently available in Nuvoton API
The DPS SDK Sample Project contains audio settings (DPS Profiles) for the HMDX P420 portable speaker. These profiles will sound good for most portable speakers including the Jawbone Jambox and others. We recommend using a portable speaker with acceptable low frequency response for this evaluation.
The following instructions will walk you through using the basic functions of the DPS Profile Creator when connected to the NUC505 Audio Board:
- Follow the NUC505 Audio Board Setup instructions above. Verify the serial platform connection status displays “Normal” in the information area (16) on the Main Window.
- Play music from your audio source into the analog input of the Audio Board.
- Verify you have audio output from your portable speaker.
- Click the B logo (15) on the Main Window of the DPS Profile Creator. You should hear the audio processing difference when DPS turns off.
- Turn DPS back on by clicking the logo again. This will call the function
DPS_EnableDPS(); - Be sure you are facing the portable speaker. Move the STEREO WIDENING control to maximum (100%).
- If you are listening to a stereo audio source, you will hear the stereo image extend past the edges of your portable speaker.
- Right click on the STEREO WIDENING control. This will call the DPS API functions:
DPS_BypassStereoWidening();
DPS_EnableStereoWidening(); - Click PROFILE button 1 on the User Controls Window. This will call the function
DPS_LoadPreset(0);in the DPS API to switch to profile 1.
- Click the other PROFILE buttons 1 through 4.
- You will hear variations on the portable speaker sound for Music, Movie and Voice modes.
- Right-Click on the STEREO WIDENING control then select Enable.
- Raise the slider to hear more 3D effect for speakers.
- NOTE: Headphone effects will be disabled for the speaker demo.
- Move the VOLUME slider up and down to hear the DPS volume control API effect.
- The signal path location of the volume control is set using the drop-down menu at the top of the User Controls window.
- BEFORE OUTPUT AGC places the volume control before the 2 band speaker protection Automatic Gain Controllers (AGC). Using the DPS Volume Control API in BEFORE mode is very important for getting the best sound out of smaller speaker systems.
- AFTER OUTPUT AGC places the volume control slide after the speaker protection AGCs. This is useful for higher power systems where speaker protection is not needed.
- Right click on the BASS or TREBLE controls to enable them.
- The BASS and TREBLE equalizers always initialize in bypass mode to conserve ARM processor usage.
- Move the circle around in the BASS or TREBLE x/y pads to hear the tone control effect.
- Horizontal movement changes the frequency center of the bell filter.
- Vertical movement changes gain boost or cut.
- Right-click on the bottom text box below the eq x/y pad. This allows selection of the Q (width) value of the bell filter.
- Click a signal flow block in the Main Window (1-14) to open the window that controls that block.